Hey there! I’m Chef Margaret, and after 15 years of perfecting pies in my home kitchen, I’m thrilled to share with you the ultimate apple pie deep dish recipe. If you’re looking for a dessert that fills your home with the warm aroma of cinnamon‑spiced apples and a buttery, flaky crust that holds a generous, juicy filling, you’ve come to the right place. This apple pie deep dish recipe isn’t just another pie—it’s a show‑stopper that will impress family, friends, and even the pickiest eaters. In the next few minutes you’ll discover why this apple pie deep dish recipe stands out, what ingredients you’ll need, and step‑by‑step instructions to make it flawlessly every time. By the end of this guide you’ll have everything you need to bake a deep‑dish apple pie that’s as beautiful as it is delicious. And remember, this apple pie deep dish recipe is completely fool‑proof, whether you’re a seasoned baker or a first‑time pie maker.
Why Bake a Deep‑Dish Apple Pie?
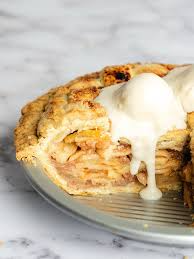
A deep‑dish apple pie offers several advantages over a traditional shallow pie. First, the deeper bowl allows you to load more filling, which means every bite is bursting with juicy, spiced apples. Second, the thicker crust walls stay crispier longer, giving you a perfect contrast of tender fruit and buttery pastry. Third, the extra depth makes it easier to serve warm with a scoop of vanilla ice cream—something that never fails to delight guests. Whether you’re baking for a holiday dinner, a potluck, or just a cozy night in, a deep‑dish apple pie is a versatile centerpiece that will earn you rave reviews.
A Brief History of Apple Pie
Apple pie has been a beloved American dessert since the early colonial days. Early settlers combined local apples with spices they could afford, creating a simple yet satisfying treat. Over the centuries, the pie evolved—from one‑crust “baked apples” to the multi‑layered, lattice‑topped masterpieces we enjoy today. The deep‑dish style gained popularity in the Midwest during the 20th century, where bakers wanted a pie that could hold a generous filling and stand up to cold weather. Today, the apple pie deep dish recipe is a staple at family gatherings, celebrations, and even professional bakeries.
Choosing the Right Apples –
Not all apples are created equal for pie. You’ll want a mix of tart and sweet varieties to achieve balanced flavor and the right texture. Here’s a quick guide:
| Apple Type | Flavor Profile | Best For |
|---|---|---|
| Granny Smith | Tart, crisp | Provides acidity and firm texture |
| Honeycrisp | Sweet, crisp | Adds sweetness and holds shape |
| Braeburn | Sweet‑tart, crisp | Excellent flavor and juiciness |
| Fuji | Sweet, slightly firm | Adds a subtle sweetness |
| Jonathan | Tart, crisp | Great for a bold flavor kick |
For the best results, use a combination of Granny Smith and Honeycrisp, or any mix you prefer. You can learn more about selecting the perfect apples at the National Apple Association.
Essential Ingredients –
Below is the full list of ingredients you’ll need for Chef Margaret’s Classic Deep‑Dish Apple Pie. I’ve kept the measurements simple and the ingredients easy to find at any grocery store.
Crust Ingredients
| Ingredient | Quantity |
|---|---|
| All‑purpose flour (or King Arthur bread flour for extra flaky layers) | 3 cups |
| Granulated sugar | ½ cup |
| Salt | 1 tsp |
| Unsalted butter, cold and cut into cubes | 1 cup (2 sticks) |
| Ice water (as needed) | 6‑8 tbsp |
If you want a gluten‑free option, substitute the flour with a 1:1 gluten‑free flour blend. For a dairy‑free version, use coconut oil in place of butter.
Filling Ingredients-
| Ingredient | Quantity |
|---|---|
| Apples (mix of Granny Smith, Honeycrisp, Braeburn) | 6‑7 cups, peeled, cored, and sliced ¼‑inch thick |
| Granulated sugar | ¾ cup |
| Brown sugar | ½ cup |
| Lemon juice (freshly squeezed) | ¼ cup |
| Ground cinnamon | 1 tsp |
| Ground nutmeg | ¼ tsp |
| Vanilla extract | 1 tsp |
| Cornstarch (to thicken the juices) | 2 tbsp |
| Salt | ¼ tsp |
Equipment You’ll Need –
| Tool | Why It’s Important |
|---|---|
| Deep‑dish pie plate (9‑inch) | Provides the classic deep bowl shape |
| Rolling pin | For flattening the dough to the right size |
| Pastry brush | To apply butter or egg wash to the crust |
| Sharp knife | For clean apple slices |
| Baking sheet | To catch any overflow during baking |
| Measuring cups & spoons | Accurate portions = perfect results |
| Mixing bowls | For combining dry and wet ingredients |
| Cooling rack | Allows the pie to set properly after baking |
Step‑By‑Step Instructions –
1. Prepare the Dough
- In a large bowl, whisk together the flour, sugar, and salt.
- Add the cold butter cubes and use a pastry cutter or your fingers to blend them into the flour until the mixture resembles coarse crumbs.
- Gradually add ice water, one tablespoon at a time, mixing just until the dough begins to clump together.
- Divide the dough into two equal portions, shape each into a disk, wrap in plastic wrap, and refrigerate for at least 1 hour.
Tip: Keep the dough cold at all times. Warm dough becomes sticky and difficult to roll.
2. Make the Filling
- In a large bowl, toss the sliced apples with lemon juice, granulated sugar, brown sugar, cinnamon, nutmeg, vanilla extract, cornstarch, and salt.
- Let the mixture sit for 15‑20 minutes; this allows the sugars to draw out excess juice and the flavors to meld.
3. Roll Out the Crust
- On a lightly floured surface, roll one disk of dough into a circle about 12 inches in diameter.
- Carefully transfer the dough to a 9‑inch deep‑dish pie plate, pressing it gently into the bottom and sides. Trim any excess dough, leaving about a ½‑inch overhang.
4. Add the Filling
- Pour the apple mixture into the prepared crust, mounding it slightly in the center.
- If the filling seems too wet, you can add an extra tablespoon of cornstarch.
5. Craft the Top Crust
- Roll out the second disk of dough to a 12‑inch circle.
- Using a pastry brush lightly dampen the edge of the bottom crust with water.
- Place the top dough over the filling. Press the edges together firmly, then crimp with your fingers or a fork for a decorative seal.
- Cut a few slant cuts (about ½‑inch apart) in the top crust to allow steam to escape during baking.
6. Finish & Bake
- In a small bowl, whisk together 1 egg with a splash of milk or water to make an egg wash. Brush the egg wash over the entire top crust for a beautiful golden‑brown finish.
- Sprinkle a light dusting of granulated sugar over the top for extra sparkle.
- Place the pie on a baking sheet lined with parchment paper (to catch any spills).
- Bake in a preheated 375 °F (190 °C) oven for 45‑55 minutes, or until the crust is golden and the apple filling bubbles thickly in the center. If the edges brown too quickly, cover them with strips of aluminum foil after the first 20 minutes.
7. Cool & Serve
- Remove the pie from the oven and let it cool on a wire rack for at least 2 hours. Cooling allows the filling to set, preventing a messy slice.
- Serve warm with a scoop of vanilla ice cream or a dollop of whipped cream.
Easy Apple Pie Deep Dish Recipe
Chef Margaret’s Classic Deep‑Dish Apple Pie is the ultimate comfort dessert that combines a buttery, flaky crust with a rich, spiced apple filling. This recipe yields a pie that’s deep enough to hold generous slices of crisp apples, perfectly balanced with a hint of tartness and warm cinnamon. The crust is made from simple, high‑quality ingredients—cold butter, premium flour (you can use King Arthur bread flour for extra flakiness), and just enough water to bring the dough together. The filling features a harmonious mix of Granny Smith, Honeycrisp, and Braeburn apples, tossed in a blend of granulated and brown sugars, lemon juice, vanilla, and a touch of cornstarch to thicken the juices beautifully. After baking at 375 °F for 45‑55 minutes, the result is a golden‑brown, aromatic pie that bubbles with juicy apples in the center. Serve it warm with vanilla ice cream for a timeless treat that will have everyone asking for seconds. Whether you’re celebrating a holiday, hosting a potluck, or simply craving a cozy night‑in dessert, this deep‑dish apple pie delivers unmatched flavor, texture, and presentation.
- Total Time: 2 hours 5 minutes (including chilling)
- Yield: 8 servings
Ingredients
Crust
- 3 cups all‑purpose flour (or King Arthur bread flour)
- ½ cup granulated sugar
- 1 tsp salt
- 1 cup (2 sticks) cold unsalted butter, cubed
- 6‑8 tbsp ice water
Filling
- 6‑7 cups mixed apples (Granny Smith, Honeycrisp, Braeburn), peeled, cored, sliced ¼‑inch
- ¾ cup granulated sugar
- ½ cup brown sugar
- ¼ cup fresh lemon juice
- 1 tsp ground cinnamon
- ¼ tsp ground nutmeg
- 1 tsp vanilla extract
- 2 tbsp cornstarch
- ¼ tsp salt
Instructions
- Make the dough: Combine flour, sugar, and salt. Cut in butter until crumbly; add ice water until just combined. Divide, shape into disks, and chill 1 hour.
- Prepare filling: Toss apples with sugars, lemon juice, spices, vanilla, cornstarch, and salt; let sit 15 min.
- Roll crust: Roll one disk into a 12‑inch circle; line a 9‑inch deep‑dish plate. Trim edges.
- Fill: Transfer apple mixture into crust; mound slightly.
- Top crust: Roll second disk, place over filling, crimp edges, cut slits, brush egg wash, sprinkle sugar.
- Bake: 375 °F (190 °C) for 45‑55 min, until golden and bubbling. Cool 2 hrs.
- Serve: Warm with ice cream or whipped cream.
Notes
Notes
- Chill dough for easier rolling.
- Use a mandoline for uniform slices.
- Add a splash of bourbon for extra flavor.
- Cover edges with foil if they brown too fast.
- Prep Time: 30 minutes (plus 1 hour chilling)
- Cook Time: 45‑55 minutes
- Category: Dessert
- Method: Baking
- Cuisine: American
- Diet: Gluten Free
Pro Tips & Helpful Notes –
| Tip | Why It Helps |
|---|---|
| Chill the dough before rolling | Keeps it firm and easy to roll, preventing shrinkage |
| Use a mandoline slicer for uniform apple slices | Gives consistent texture and faster prep |
| Don’t over‑mix the filling | Over‑mixing can break down the fruit and make the pie mushy |
| Add a splash of bourbon or brandy to the filling (optional) | Boosts flavor depth and adds a subtle adult twist |
| Brush the crust with butter before baking (instead of egg wash) | Gives a richer, more buttery sheen |
| Bake on a lower rack to avoid the top crust burning | Provides even heat distribution |
| Let the pie rest for at least 2 hours before slicing | Allows the filling to thicken and the crust to firm up |
| Store leftovers in the fridge for up to 4 days | Keeps the filling from becoming too juicy |
Serving Suggestions –
- Ice Cream Pairing: A classic vanilla ice cream scoop melds perfectly with the warm, spiced apples.
- Whipped Cream: Light, sweet whipped cream adds a fluffy contrast.
- Cheese: A mild Cheddar or Gouda cheese board makes a delightful savory complement.
- Coffee: Serve with a freshly brewed espresso or a warm apple‑cinnamon latte for a cozy experience.
Storing & Reheating Your Pie –
| Method | Instructions |
|---|---|
| Refrigerator | Store cooled pie in a shallow, airtight container for up to 4 days. |
| Freezer | Wrap cooled pie tightly in plastic wrap and foil; freeze for up to 2 months. Thaw in the fridge overnight before reheating. |
| Reheating | Warm slices in a 300 °F (150 °C) oven for 10‑15 minutes or in a microwave for 30‑45 seconds on low power. |
Nutritional Information –
Below is the approximate nutrition per serving (based on 8 servings). For the most accurate data, consult the USDA FoodData Central.
| Nutrient | Amount per Serving |
|---|---|
| Calories | ≈ 350 kcal |
| Total Fat | 12 g |
| Saturated Fat | 6 g |
| Cholesterol | 30 mg |
| Sodium | 210 mg |
| Total Carbohydrates | 55 g |
| Dietary Fiber | 4 g |
| Sugars (including natural) | 30 g |
| Protein | 4 g |
Note: Nutritional values can vary depending on exact apple varieties, sugar amounts, and whether you use butter or a butter substitute.
Variations & Substitutions –
| Variation | How to Adapt |
|---|---|
| Gluten‑Free | Use a 1:1 gluten‑free flour blend for the crust and keep all other ingredients the same. |
| Vegan | Substitute butter with cold vegan butter or coconut oil, and replace the egg wash with a milk‑plus‑water brush (½ cup milk + 1 tbsp water). |
| Nut‑Free | Skip any optional nuts in the filling; the base recipe is naturally nut‑free. |
| Spice Swap | Replace cinnamon with apple pie spice blend or add a pinch of cloves for extra warmth. |
| Apple‑Cranberry | Add ½ cup fresh or dried cranberries to the filling for a tart contrast. |
| Briar Smoke | Brush the baked crust with a briar smoke‑infused butter after baking for a smoky finish (great for adult gatherings). |
Conclusion
There you have it—Chef Margaret’s apple pie deep dish recipe that will become a family favorite in no time. From selecting the perfect apples to mastering the flaky crust and rich filling, this guide covers every detail you need for a flawless pie. Remember, the apple pie deep dish recipe isn’t just about the ingredients; it’s about the love, patience, and attention you give each step. Whether you’re baking for a special occasion or a quiet dinner, this deep‑dish apple pie will fill your kitchen with warmth and delight your guests with its classic, comforting flavors. Happy baking, and enjoy every bite!
Frequently Asked Questions
Q1: Why does my deep‑dish apple pie spill over the edges?
A: The filling expands as it bakes. Make sure to fill the pie slightly below the rim and pre‑bake the crust for 5 minutes before adding the filling. This helps contain the juices.
Q2: Can I make the crust ahead of time?
A: Absolutely! You can refrigerate the dough disks for up to 2 days or freeze them for up to 1 month. Just thaw and roll out when you’re ready to bake.
Q3: My apples are too firm—what can I do?
A: Toss the sliced apples with a tablespoon of lemon juice and a pinch of salt and let them sit for 10 minutes. This softens them slightly while preserving crispness.
Q4: Is it okay to use canned apples?
A: Fresh apples are best for flavor and texture, but you can use canned apples in a pinch. Drain them well and add an extra tablespoon of sugar to compensate for lost moisture.
Q5: How do I know when the pie is done?
A: The crust should be golden‑brown, and the filling should be bubbling thickly in the center. Insert a knife near the edge—if it comes out clean, the pie is ready.
Q6: Can I freeze the unbaked pie?
A: Yes! Freeze the assembled, unbaked pie (with filling) for up to 2 months. Wrap tightly in plastic wrap and foil, then bake from frozen, adding 10‑15 minutes to the cooking time.